ubuntu 18.04 LTS 下安装配置 PyQt5
1.安装相关的库
如果先安装了miniconda, 卸载miniconda, 在安装了 PyQt5 之后再重新安装 miniconda, 否则有兼容性问题无法启动spyder, 报错:
ModuleNotFoundError: No module named 'PyQt5.QtWebKitWidgets'
假设为某个激活的 conda 环境安装 PyQt5(可以为默认环境), 在该环境下:
- pip install  PyQt5 -i https://pypi.tuna.tsinghua.edu.cn/simple
- pip install PyQt5-stubs  -i https://pypi.tuna.tsinghua.edu.cn/simple
- sudo apt-get install qttools5-dev-tools //安装Qtdesigner
- sudo apt-get install qt5-default
- sudo apt install pyqt5-dev-tools  //安装pyqt5工具 pyuic
2.为PyCharm配置 PyQt5
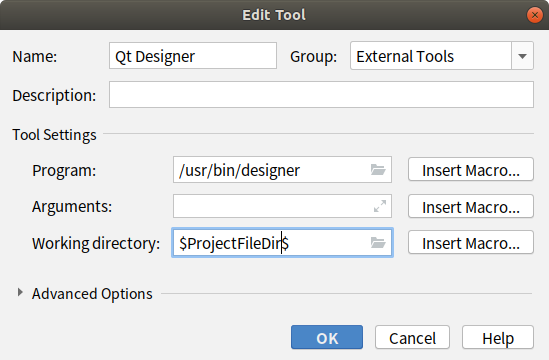
为PyCharm添加快捷使用的拓展工具 Qt designer :
File ---> Settings ---> Tools ---> External Tools --->
add(Alt + Insert),Working directory:工作路径,设置为$ProjectFileDir$

同样,为PyCharm添加将Qt的ui文件转换为python程序的PyUIC工具:

- name----PyUIC
- Arguments----$FileName$ -o $FileNameWithoutExtension$.py
- Working dirctory----$ProjectFileDir$
回到pycharm主界面菜单,Tools ---> External Tools 下会出现Qt designer 和 pyUIC两个子菜单。
使用 Qt designer 做一个登录界面Demo,并将对应文件 login.ui保存到项目目录下:

右键 login.ui, External Tools ---> pyUIC, 会将 .ui 文件转为 .py 文件 login.py,实际上是一个 Ui_Form 类:
# -*- coding: utf-8 -*-

# Form implementation generated from reading ui file 'login.ui'
#
# Created by: PyQt5 UI code generator 5.10.1
#
# WARNING! All changes made in this file will be lost!

from PyQt5 import QtCore, QtGui, QtWidgets

class Ui_Form(object):
    def setupUi(self, Form):
        Form.setObjectName("Form")
        Form.resize(316, 202)
        self.widget = QtWidgets.QWidget(Form)
        self.widget.setGeometry(QtCore.QRect(50, 40, 242, 130))
        self.widget.setObjectName("widget")
        self.gridLayout = QtWidgets.QGridLayout(self.widget)
        self.gridLayout.setContentsMargins(0, 0, 0, 0)
        self.gridLayout.setObjectName("gridLayout")
        self.label = QtWidgets.QLabel(self.widget)
        self.label.setObjectName("label")
        self.gridLayout.addWidget(self.label, 0, 0, 1, 1)
        self.lineEdit = QtWidgets.QLineEdit(self.widget)
        self.lineEdit.setObjectName("lineEdit")
        self.gridLayout.addWidget(self.lineEdit, 0, 1, 1, 2)
        self.label_2 = QtWidgets.QLabel(self.widget)
        self.label_2.setObjectName("label_2")
        self.gridLayout.addWidget(self.label_2, 1, 0, 1, 1)
        self.lineEdit_2 = QtWidgets.QLineEdit(self.widget)
        self.lineEdit_2.setObjectName("lineEdit_2")
        self.gridLayout.addWidget(self.lineEdit_2, 1, 1, 1, 2)
        self.checkBox = QtWidgets.QCheckBox(self.widget)
        self.checkBox.setObjectName("checkBox")
        self.gridLayout.addWidget(self.checkBox, 2, 0, 1, 2)
        self.pushButton_2 = QtWidgets.QPushButton(self.widget)
        self.pushButton_2.setObjectName("pushButton_2")
        self.gridLayout.addWidget(self.pushButton_2, 3, 0, 1, 2)
        self.pushButton = QtWidgets.QPushButton(self.widget)
        self.pushButton.setObjectName("pushButton")
        self.gridLayout.addWidget(self.pushButton, 3, 2, 1, 1)

        self.retranslateUi(Form)
        QtCore.QMetaObject.connectSlotsByName(Form)

    def retranslateUi(self, Form):
        _translate = QtCore.QCoreApplication.translate
        Form.setWindowTitle(_translate("Form", "Form"))
        self.label.setText(_translate("Form", "用户名:"))
        self.label_2.setText(_translate("Form", "密码:"))
        self.checkBox.setText(_translate("Form", "记住用户名和密码"))
        self.pushButton_2.setText(_translate("Form", "取消"))
        self.pushButton.setText(_translate("Form", "确定"))
使用命令行也可以由ui文件生成py文件,所以完全可以不安装pycharm这个资源大户:
pyuic5 -o login.py login.ui
添加如下代码:
if __name__=="__main__":
    import sys
    app=QtWidgets.QApplication(sys.argv)
    widget=QtWidgets.QWidget()
    ui=Ui_Form()
    ui.setupUi(widget)
    widget.show()
    sys.exit(app.exec_())
保存后运行 login.py, 即可以看到之前设计的界面了。
用PyQt5写的第一个程序
1.用Qt Designer 创建界面
随便拖点部件并保存, 这里假设保存为 MainWindow.ui ,并用 PyUIC 生成对应的python文件 MainWindow.py
2.创建app入口python文件 main.py
假设在项目文件夹下创建了图标文件夹 img, 并放入了 logo.png 作为窗体图标
import sys
import MainWindow
from PyQt5.QtWidgets import QApplication, QMainWindow
from PyQt5.QtGui import QIcon

class AppWindow(QMainWindow,MainWindow.Ui_MainWindow):
    # 继承了 Ui_MainWindow类,使用其构造方法构造主窗口
    def __init__(self,parent=None):
        # super()方法返回了AppWindow类的父类对象,并且调用了父类的构造方法
        # __init__()方法是Python语言中的构造方法。
        super(AppWindow,self).__init__(parent)
        self.setupUi(self)
        # 窗口图标
        self.setWindowIcon(QIcon("img/logo.png"))


if __name__ == '__main__':
    # 定义程序的入口,通过创建QApplication对象来创建Qt窗口
    app = QApplication(sys.argv)
    appWindow = AppWindow()
    appWindow.show()
    # 应用进入主循环,事件处理开始执行
    # 主循环用于接收来自窗口触发的事件,并且转发他们到widget应用上处理
    # 如果调用exit()方法或主widget组件被销毁,主循环将退出
    # sys.exit()方法确保一个不留垃圾的退出。系统环境将会被通知应用是怎样被结束的。
    # exec_()方法有一个下划线。因为exec是Python保留关键字。因此,用exec_()来代替。
    sys.exit(app.exec_())
3.打包
安装 pyinstaller:
conda install pyinstaller
编译:
pyinstaller -F main.py
可能的报错信息:
Exception:
            Cannot find existing PyQt5 plugin directories
            Paths checked: c:/qt/qt_1533082737779/_h_env/Library/plugins
创建错误提示中的目录c:/qt/qt_1533082737779/_h_env/Library/plugins,把类似 C:\Miniconda3\Lib\site-packages\pyqt5_tools\plugins下的pyqt5qmlplugin.dll拷贝到该目录下,重新打包, 在 dist目录下会生成 main.exe. 运行该程序可能的错误信息:
This application failed to start because it could not find or load the Qt platform plugin "windows"
in "".

Reinstalling the application may fix this problem.
拷贝类似 C:\Miniconda3\Library\plugins 下的 platforms 文件夹到可执行文件的文件夹下即可.
运行如下命令添加图标报错:
pyinstaller  -F main.py -i favicon.ico  --noconsole
struct.error: unpack requires a buffer of 16 bytes
参考 https://blog.csdn.net/u010000209/article/details/18762445 生成 ico,重新打包.
这样生成的app有图标了, 但是 img下的png图片并没有显示, 拷贝 img文件夹到 main.exe 同一目录即可.
其他
解决在安装PyQt5后spyder不能输入中文的问题:
cp /usr/lib/x86_64-linux-gnu/qt5/plugins/platforminputcontexts/libfcitxplatforminputcontextplugin.so ~/miniconda3/lib/python3.7/site-packages/PyQt5/Qt/plugins/platforminputcontexts
卸载 pycharm:
sudo snap list
sudo snap remove pycharm-community